We live in a wonderful urban neighborhood in Honolulu called Kaimuki. Seated on the backside of Diamond Head, it’s an enjoyable mixture of both modern and century-old homes, a funky/trendy business area, and a populace that includes most all of our island’s varied ethnic heritages.
It’s also great for walking…rolling hills, old concrete sidewalks (with the occasional child’s handprint), and fresh trade winds that provide delightful comfort during an evening stroll. One notable feature is a high, rocky point topped by a small park. Called “Christmas Tree Park” by locals, it’s just a few blocks from home, and during early evening it’s quite popular. There’s a group of dog-lovers who habitually gather, perhaps some first-daters trying things out, and a variety of others who enjoy the westward view over Honolulu at sunset.
While I’m not a regular, I do occasionally drift up that way after supper. And it was on such an evening that I finally decided to get started on the early-evening painting I’d been contemplating.
The Influence
For years prior, I’d been admiring a painting by the 19th century Spanish painter Ramon Casas. His was also a “townscape”, of Montmartre, painted as it appeared back in the Impressionist days. I’ve always been excited by Casas’s picture; an interesting puzzle-pattern of darks and lights, rooftops, roads, and trees. It was definitely an inspiration for where I hoped my own picture could go.
As for my effort, I envisioned a days-end feeling: the fading daylight, with rose colored cloudbanks overhanging the rooftops and random jumble of our neighborhood. And all to be painted in thoughtful, descriptive brushstrokes.
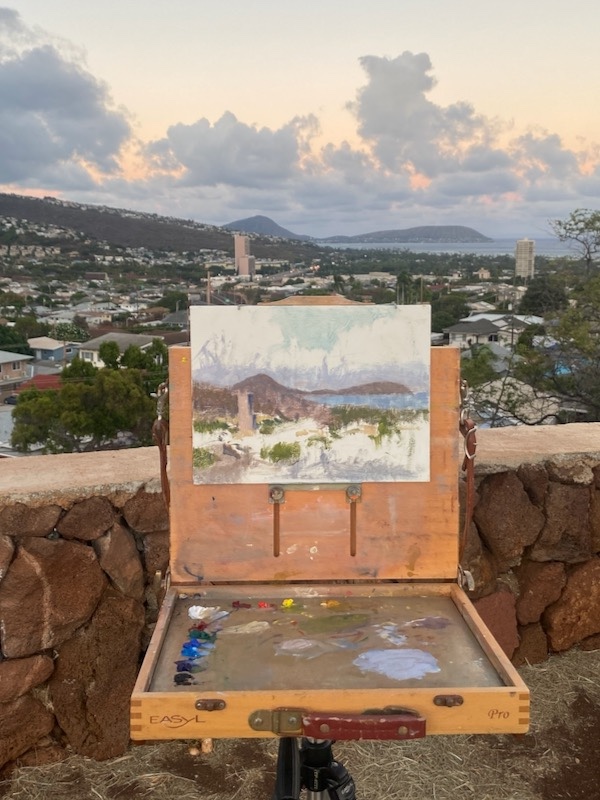
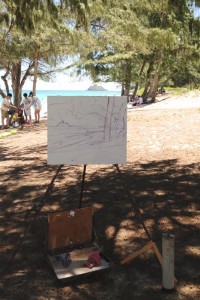
The initial setup and progress in the lay-in.
A Strategy
I decided it would be best to arrive at the spot around 5:45 each evening. This would allow a window of workable light of perhaps 45 minutes. I supposed I’d need perhaps 8 or more sessions, but it was hard to tell.
Practicalities
I keep “prepared” wooden painting panels in my studio, and decided 9 x 12″ was the right size. I also chose to use a tripod mounted pochade box. This would keep things compact… important because my own shadow was needed to block the sunlight behind me from falling on the painting, which would distort the light/shadow effect. Gusts of strong wind made using an umbrella to shield the painting from the setting sun too risky.
The Start
The first round of work involved getting the “main pieces” in the right spots on my panel.
I never rush this step because the personality of the whole painting begins in how the painting’s space is”divided”.
I thought of the “main pieces” as the areas of land, sea, clouds and sky. . . 4 large, interlocking puzzle pieces. Which of those areas were to “dominate” is what determined the cropping.
The large tower’s placement in the lower left quadrant was important. It’s a strong “point of attraction”…but needed to be placed with care. The distant peninsula needed that slight “opening” on its far right edge. It connects sky and ocean as a single shape.
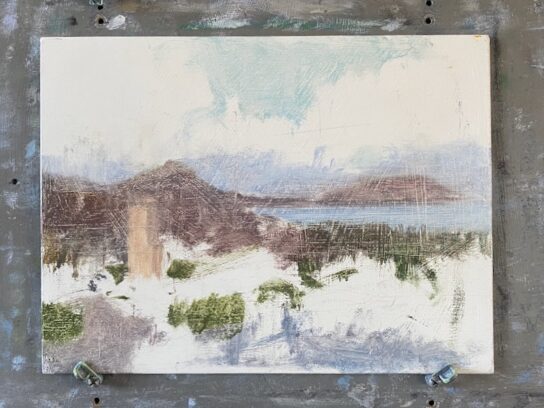
After the first sessions work. The paint was scraped down with a palette knife to “lose” hard edges and unify the work overall.
Next Steps
Weather permitting, I continued to return each evening for more work on the painting. Progress was gradual, but steady, always keeping the original intentions I described in mind.
In time I found that I was able to anticipate what the light and color were likely to do, which was a big help. This is just a sidebar here, but becoming familiar with the “personality” of a given location is a really wonderful secondary aspect of the “plein-air “painting process. One’s painting locations can also, in time, become places of deep reflection and attachment.
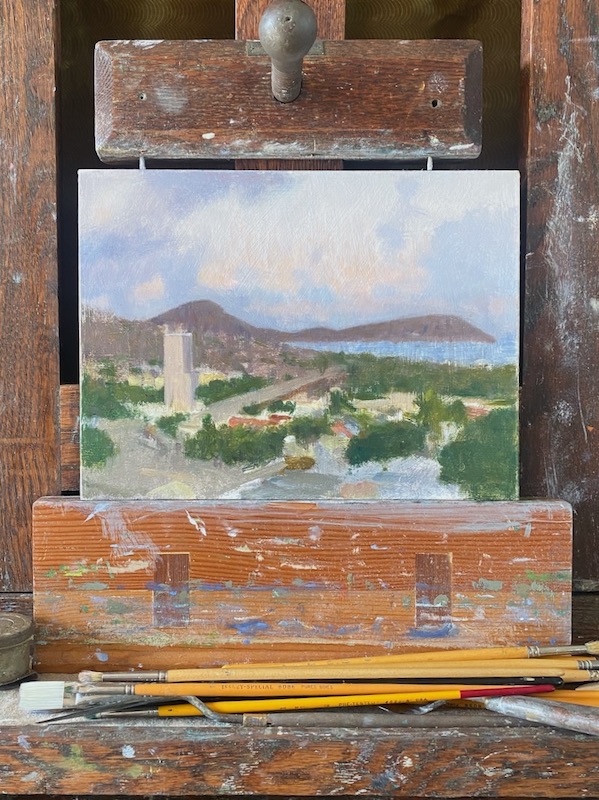
The painting on my studio easel, a few more sessions in, undergoing some morning-after adjustments.
As the work progressed further, I also committed to trying to maintain some ideals…
To attempt to paint the “ensemble effect” …the overall appearance of the entire scene as it might appear in one glance.
Seeing everything as “simply a piece of paint” of a particular shape, value, and color.
To pursue “suggestion” over “explanation”.
Completion Of The Work
The completed painting
Further sessions were simply about adjusting and refining, always with an eye towards the look of the entire painting, not fussing over specific and irrelevant details.
There was a nice general interest from the public. Most were unfamiliar with the kind of work I was doing. It was pleasant to offer some explanations to the curious. That was a nice sidebar to the whole project.
Because the painting is in traditional oils, the actual drying time is a minimum of six months. At that date, the owner of the painting will return it briefly for a final varnish. This will the crowning moment. . .the painting will then be restored to its original richness of color and permanently protected.
This morning, Honolulu was greeted with overcast skies, so I immediately changed my painting plans to take advantage of the situation… because an overcast day is ideal for painting ocean studies.
“Ocean studies” are exercises. In painting and drawing, we gradually educate ourselves about the behavior and look of the ocean by repeated exposure. The more of this direct contact I have, the more fluent I’ll become, enabling me to paint with more confidence and authority.
With ocean work, “overcast” helps
Overcast is good because it’s on such days that I find the ocean easiest to paint. In Hawai’i, perhaps unlike other areas, finding shade to work in is critical. Oftentimes, the rocky coastlines I prefer lack shade. So it’s great news when we have some good cloud cover.
Some other points regarding overcast days:
-Almost all the values (shades of dark & light) will fall in the middle range. What this means is that the lightest whites of the breaking waves are slightly less than the pure white on my palette. The darks in rocks are slightly less dark than my darkest pigments. Therefore, our notes of color become closer to what can be reached with paint.
-Because sunlight is restricted, the effect of sunlight is diffused and doesn’t change as much during the painting session. This might give me more time to paint before the light changes.
My purpose in making studies
In anything I refer to as a “study”, my main intention is to learn by doing.
If a study looks good when finished, that’s terrific, and I want that to be the case. But that isn’t the entire target. Ocean studies are an ongoing seeking-out of design ideas, the “notes” of color (the actual look of the color in the right value), and the shapes and rhythms of the sea. By exposure to direct observation, brush in hand, a vocabulary can be built. That’s a skill I want to have internalized so that when struggling with a painting I’ll have a reliable sense of when I’m getting close to the look of nature….and when I’m not.
Ignore the spectacular
The ocean possesses numerous sensitive moods, and each has artistic value. The dramatic crashing wave-against-rock theme is not the only possibility, so it’s wise to become aware of others. The observation of the quiet-but-telling secondary actions of the sea is of great importance and is possibly the most difficult. Understanding that waves are visible, fluid manifestations of energy is a good framework for launching out on the work of painting the ocean, and if viewed that way, we may find interesting motives for paintings.
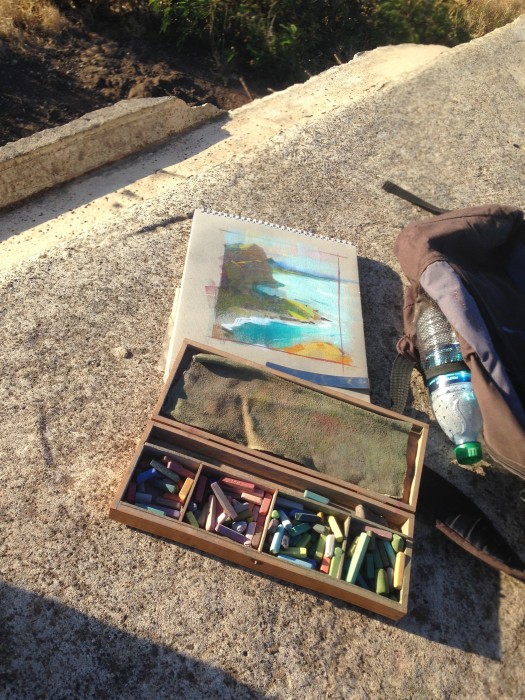
Getting practical
I’m generally hoping to be out early for ocean work. My setup is with a lightweight easel and color box that I’ve been favoring over the last few years. I carry the minimum of things needed, refined from a lot of practice, and pack my equipment the prior evening. When I arrive at the location, I don’t haul my equipment around looking for a spot. Rather, I look for my spot and then bring my equipment to it.
My palette for the ocean includes (Lead) White, Yellow Ochre, Cadmium Lemon, Indian Red, Permanent Crimson, and Viridian; for blues, Cerulean, Cobalt, and Ultramarine, and finally Ivory Black. For the painting to follow, I chose an 11 x14″ oil-primed wooden panel. This is large enough to allow some freedom of brushwork, but small enough to complete in a few hours. As the photos show, it’s mounted against a neutral gray backing, which allows a consistent middle gray around the margin of the study; this helps me judge things a bit better.
Composing
I always try to think through the composition of anything I put my brush to. That’s a discipline I need to practice. Art ultimately is dependent on taste…and so each step can at least be an effort in the direction of making better choices.
In this case, my interest was the action of the largest wave. Since the painting is so middle-value, I chose to include the rock (which is stationary and dark), and place it where I thought it would be most helpful to the overall design. This gave me something dark to measure the other values against. Also, the wet sand aspect introduced the only truly warm color notes (ochre), and added to the dark of the rock, really helps bring the study to life.
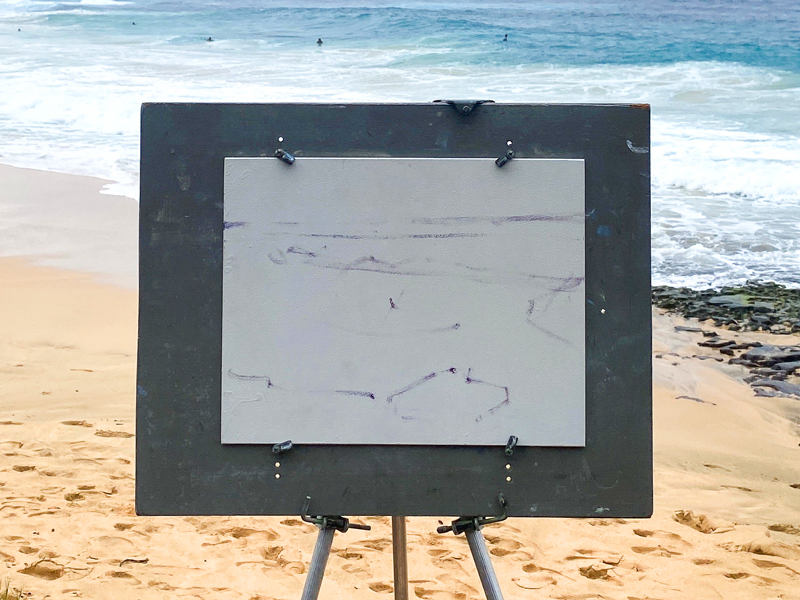
I always want the largest shapes (sky, sea, sand, white of the waves, etc) to contribute to an interesting pattern in and of themselves. In this case the division shown on the white panel, though done quickly, does reflect some concern for realizing that. Notice there’s a small “x” mark painted in the center of the canvas… it’s a help to arranging those big shapes. The lines are painted in after some planning with light charcoal lines, which were dusted off before the paint went on.
Painting general-to-specific
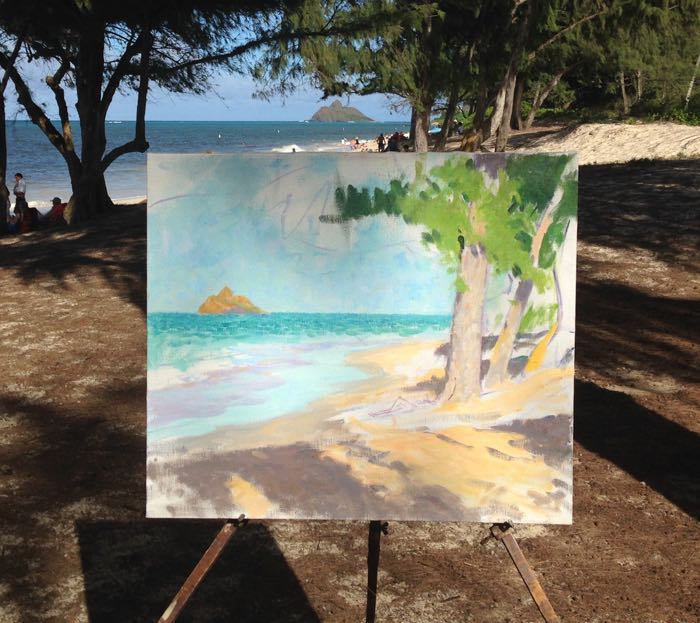
I always begin work from the most general towards the specific. This applies to shapes, values, and colors. So after the drawing in of the main shapes, my next objective is to seize the overall color-cast of this morning, which is a gray and cool effect. The best place is to begin with the sky, the furthest element from me and also the source of the light.
I mix a general value of blue gray, getting as close in color as I can to what I’m seeing. Using a large filbert brush I begin to lay-in the sky with a hearty amount of paint. I use individual brushloads placed side by side, something like a mosaic. My task here is to cover the white panel with a general value of each main color area. Once I get this, I will come back and refine the work. Virtually everything in my painting will be treated more than once, or more times. In the general-to-specific approach, it’s important to get the entire painting started (general), and suspend working on the specific (smaller elements and details) until that’s accomplished. Then, revisit each element, drawing it all together into a cohesive visual whole.
As I am doing this, I’m also watching the general motion of the sea, and considering how I might best capture the action of the waves, the purpose of the study.
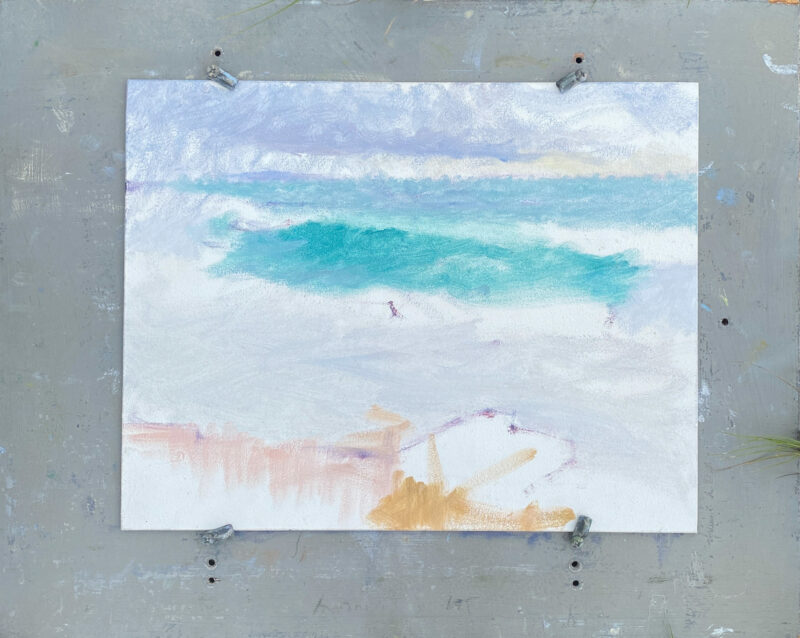
Initial lay-in of pigment
An important point to keep in mind, and the reason for starting with the sky, is that whatever is going on there is also happening in the ocean. Students hear me refer to the sky and the ocean as a married couple; one’s mood is affecting the other’s mood directly.
As I get the general effect of the sky in place, I begin to work that color down into the color of the water. Because we have overcast conditions, I can get the actual colors and values I see in the water without too much trouble.
Continuation of lay-in
The large area of broken white water, generated by the breaking wave and shallow, sandy bottom, is a matter of getting just the right value of gray. I carefully mix what I need and, adjusting as I go, lay it in to the area. I’m using as much pigment as I can get on the brush, with only a touch of linseed oil. A well-loaded brush and individual brushstrokes placed one against the other is my procedure for building the painting.
My next move requires care….the general color of the rock, and especially it’s shadow side, needs to be dropped into place. because the dark shadow is the low end of my value scale.”How low”, compared to straight black, is important to judge correctly. I also look at the temperature of the dark (warm or cool?) and place it. Now, I can judge everything in the painting between the lightest and darkest notes of value…and adjust confidently now that these vital “bookends” are established.
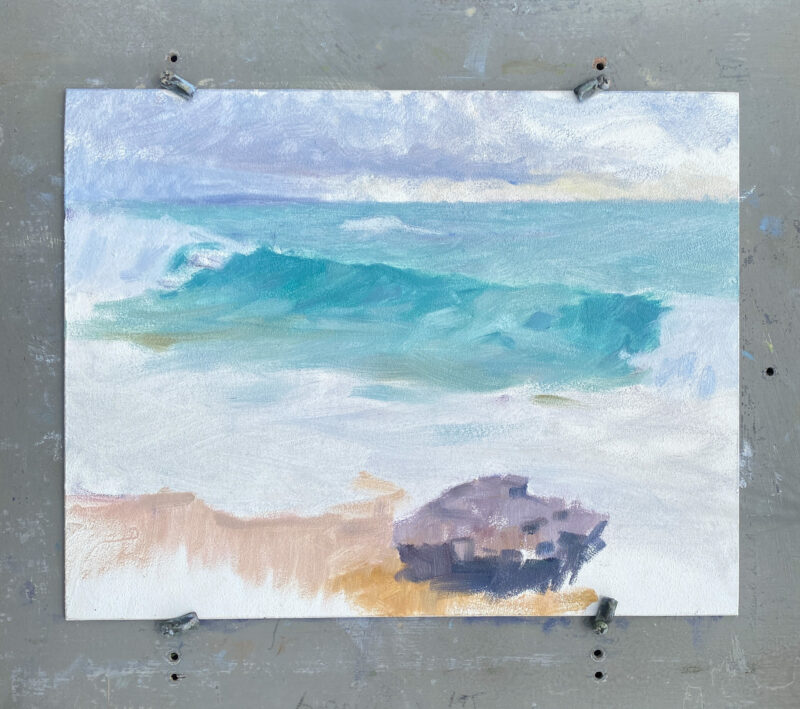
Nearly completed
As the morning progresses, I have a nice amount of paint built up on the canvas. I’ve taken real care in getting the color of the face of the wave, the middle note, as close as I can to what I’m seeing. Having Viridian on my palette is important for this.
The sun’s made it’s presence known, having moved from behind the clouds and created some light/dark contrast in the green area of the wave. I now paint those darker notes with a reasonably large brush, thinking about the direction of the strokes. At this stage, how my brush work may add to the vitality of the action is paramount. During the initial lay in, it was less so. Because I have a good body of paint in place, these darker strokes ease into the existing paint beautifully.
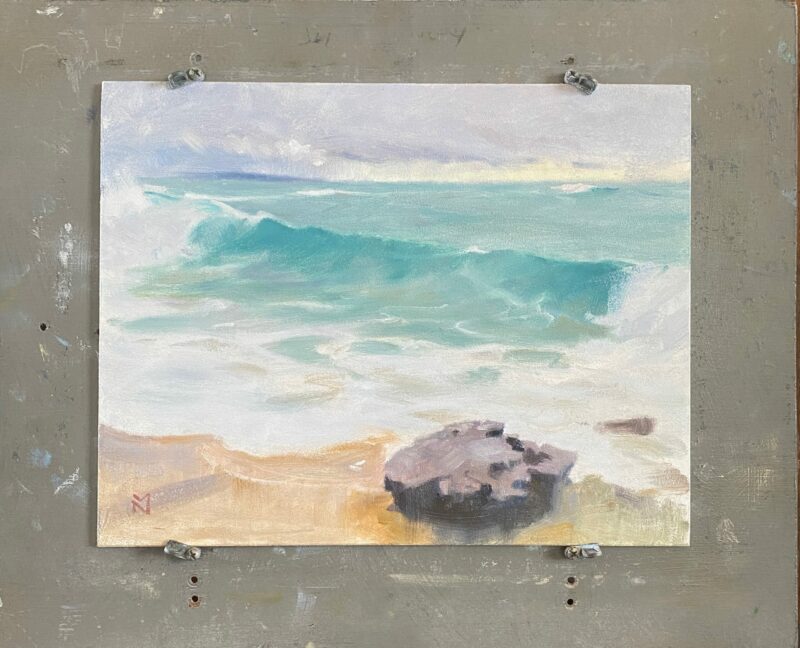
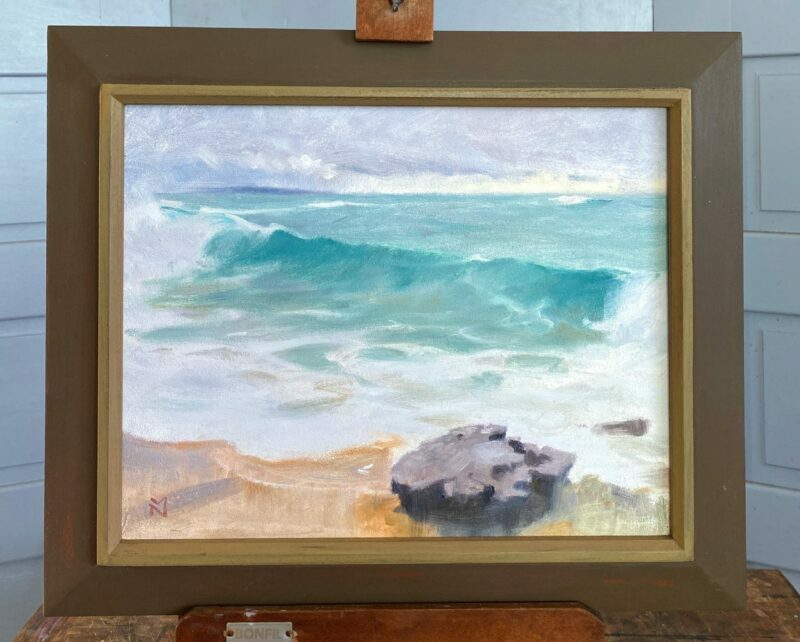
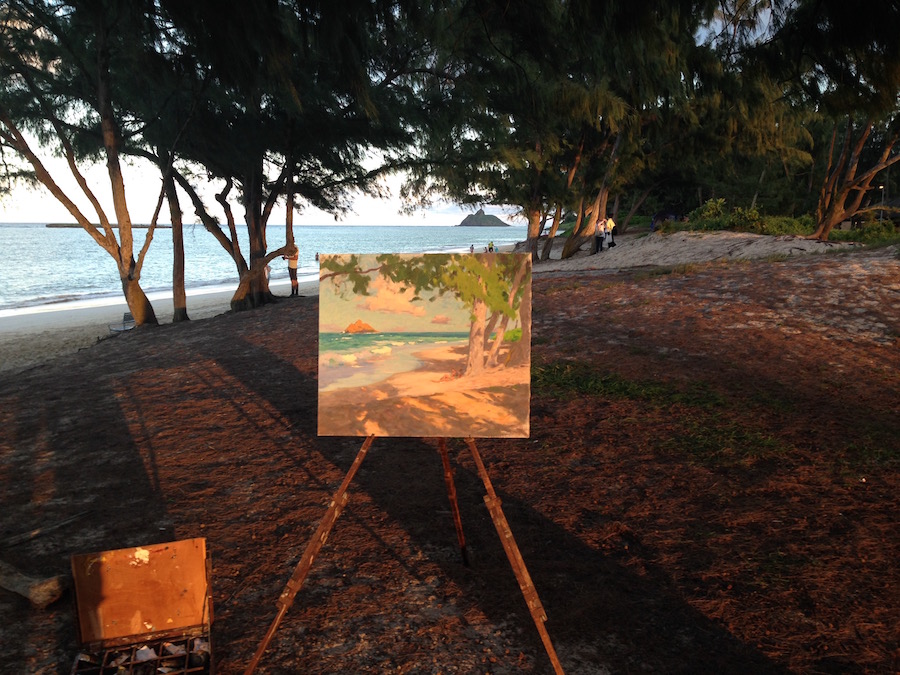
The completed study, framed
After about 90 minutes, the sunlight has managed to overcome the gray skies, and it’s unwise to continue. Doing so would introduce an entirely different concept, and one must avoid “chasing the light”.
I bring the painting back to the studio, and from memory and best judgement I make some adjustments. This stage, in actuality, is clarifying and simplifying. We don’t always make the best choices in the heat of battle, so checking back on the morning’s work after a break is always good.
Again, I’d like this to be a beautiful piece, but my real mission has been to objectively study the ocean, adding to my general knowledge of the sea. I add my monogram signature, and in 6 months the study will receive varnish for protection.
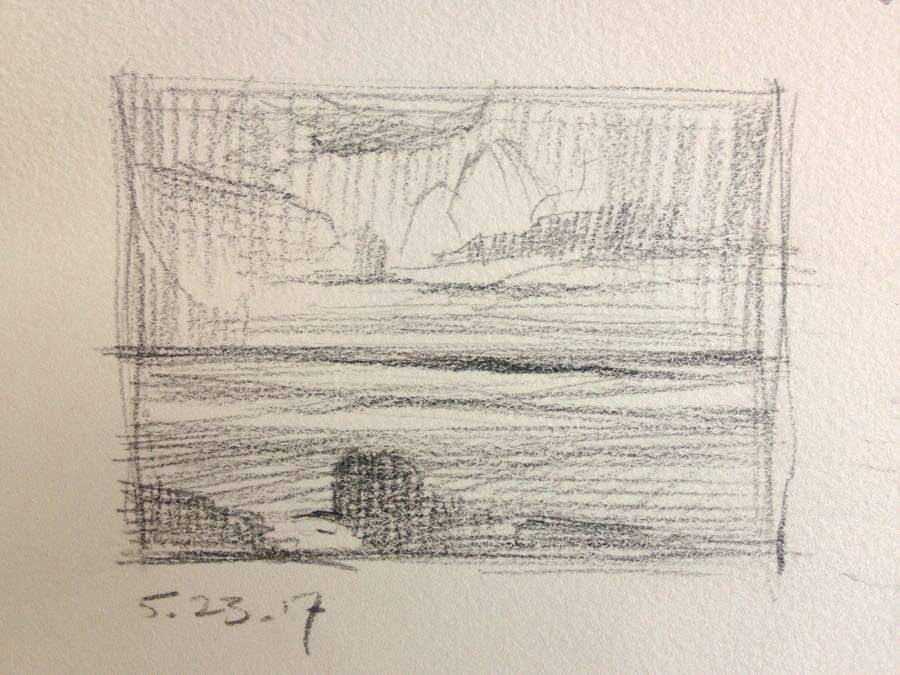
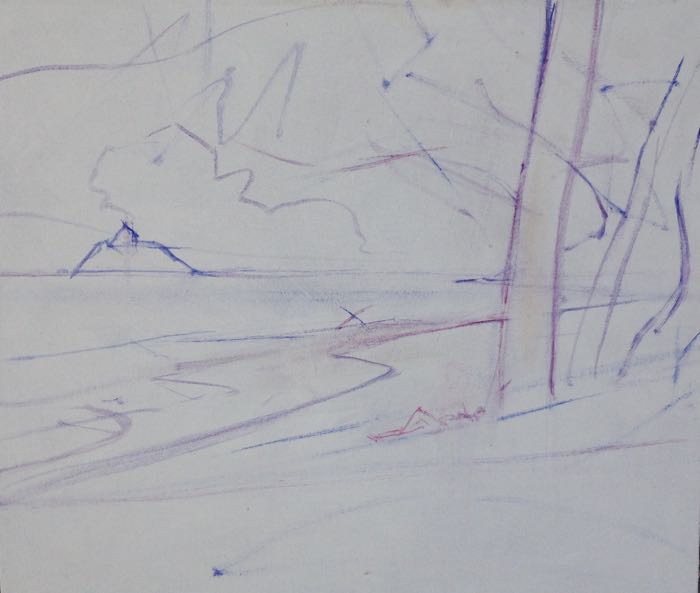
This pencil drawing, from my prior post, remains as a solid summary of what I’m after in my final piece.
I’ve relied on it to refresh my memory…in the heat of constructing a night painting, it’s easy to gradually lose oneself along the way. One needs an anchor, a plan, and I’d be lost without it eventually.
Small Pencil Sketch
The Essential Question
So, what am I after? It’s hard to know with certainty. It’s not a commercial question, though it’s a given that I’ll be doing my best to make it as beautiful as I possibly can. But there has to be something communicated, something that I see and consider worth attempting to help you to see. And as I progress through these stages of organizing the picture, that’s the thing to be cleared up.
Right now, all I know is that I want to create an emotional response like what I’ve experienced at night, out on those cliffs. And to communicate it clearly to others. I hope that this basic motivation will become more nuanced as I proceed.
The Practical: Finding My Way
One of the particular difficulties is that the final painting must be done in the studio, and from studies that cannot be executed directly from nature. It’s too dark outside. So my “visual memory” must be sharp and reliable enough to put things together. And that’s not a clearly established procedure like some other aspects of painting. I’m finding my way gradually.
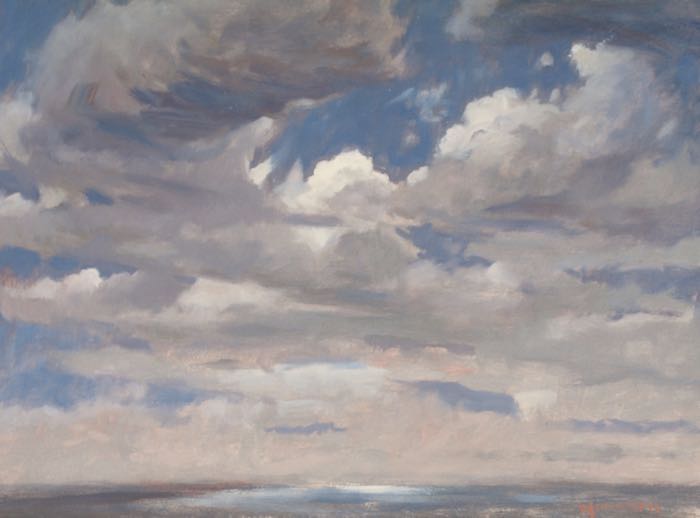
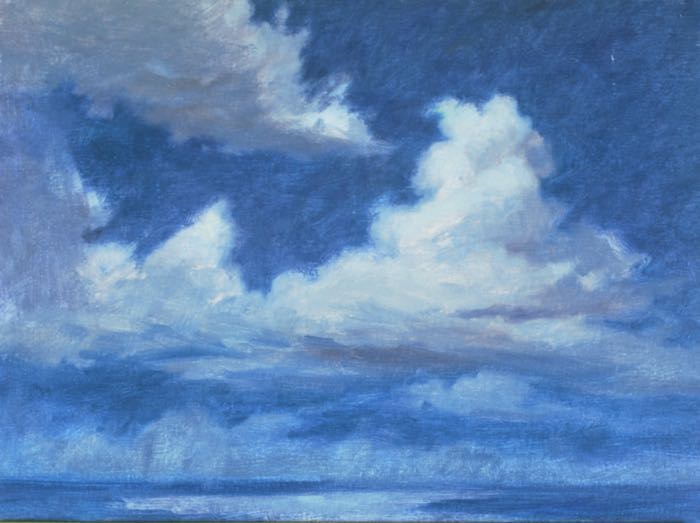
At this point I’ve determined that the next step forward, now that the basic color/mood sketch and thumbnail are established, (here), is to make studies of the clouds. They are the most complex and dramatic elements in the painting. Accomplishing this will enable me to work out my composition intelligently.
The Cloud Studies
I painted three main cloud studies from a nearby hilltop over several sessions. I sketched in the ocean beneath for scale.
It’s crucial to decide where the light source is to be in the final painting. I’ve decided it will be the moon, and positioned directly above the view, and out of the canvas. This was established in the thumbnail sketch. This is an important consideration and especially for a night painting. I want the moon outside the canvas because I would like to attempt to suggest it’s effect without including it.
Because of this, I hit upon the idea to paint the cloud studies outdoors at noontime, when the sun illuminating the clouds from directly overhead would replicate the moon at night. I could then paint the forms I saw being created by sunlight on the clouds with confidence that they could translate into the night time effect by adjusting the values.
The cloud studies in order, 11 x 14″ each.
These studies were essential and are extremely useful…not only for a night painting, but as contributing to my general knowledge. I know that work one does from nature, with all it’s hassles, roots itself in an artist’s mind in a unique way. And they were great fun to work on! Forms like clouds need to be rearranged and manipulated to move the eye within the painting; I’ve come to know that clouds are among the most flexible and reactive of the forms occurring in nature. Full of surprises, expressive, and very, very beautiful.
I’ll be springing the final study in my next installment. Mahalo (thank you) from the South Pacific!
I’ve just finished this new oil painting after many interruptions, mostly weather-related. But I managed to shoot some sequential images along the way, and I hope you find the process and progress interesting.
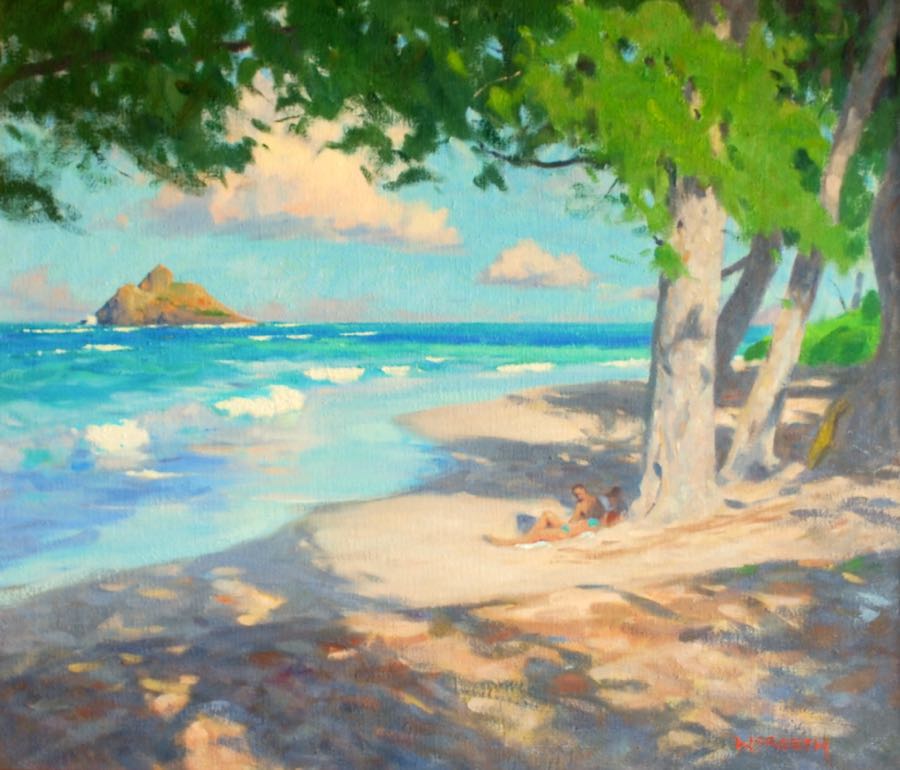
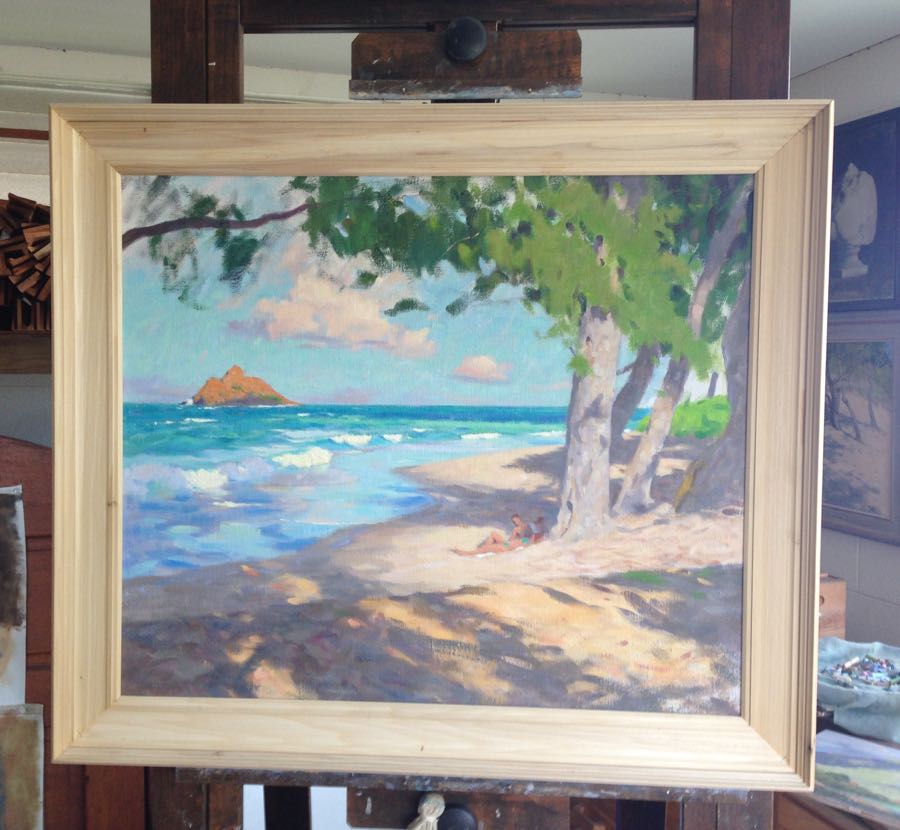
October Sun Oil on hand-primed linen, 26 x 28″
Setting Up
My setup for starting. I’m careful that the top of the canvas is perfectly level with the horizon, which you can see win the photo. I have a large pair of “Square Corners”, wooden right-angles, leaning against the right leg of the easel. When used as a viewfinder, these help tremendously with visualizing the composition. They are a must-have for composing from nature like this.
The drawing of the main lines, big shapes, and divisions of space on the canvas.
I start by placing a small x in the center of the canvas to build the composition around. Adjustments included enlarging the main tree in size from what nature provided, and moving the small island on the horizon to the far left of the canvas as a balancing measure. I’ve moved the horizon line up because it was too close to dead center.
All of this is important work and anticipates the end result I have in mind. Chances are good that anything I really dislike in the final painting is already taking root in a choice I’ve made at this stage. This part of the process can be done in one session, and an overcast day is fine for this step. I prefer to have some time back in the studio with the drawn-in painting to view the composition, preferably after leaving the location. That way I can be more objective about where I’m heading with the painting.
The composition is drawn in with a thinned mix of Ultramarine blue and Indian red and painted in with a hog-bristle round brush. I use a rag and a bit of Gamsol to wipe away any lines that need removing or adjusting.
Proceeding into Light, Shade and Color
Once light and color are introduced, the painting sessions require similar light. And as the painting progresses day to day, the window of painting time narrows to accommodate the specific effect I’m painting.
A photo taken after one or two sessions of light/color work. You can see that I’m careful to have the canvas perfectly level with the horizon. I’ve established the lightest note of light ( white of the wave) and the darkest dark (foliage in shadow) and every other value-note should fall between those two spots. This photo is taken AFTER the actual work was finished for the day… one must work when the easel is in shade, because working with direct sunlight on the canvas throws the values off, making the darkest notes appear too light.
A long shot at the end of a session, close to the last one. The painting is pretty close to being finished. This is after the light effect has gone, which is a delightful time to be with the painting and in the place after an hours’ s hard work. Notice I’m practically alone on the beach!
Framing
While the painting is in progress, the other side of the effort is that I build and finish each frame for my paintings. This work takes place on days when I have time to chip away at the framing task, often in the middle of overcast days, since most of my painting is either early or later in the daylight hours.
I enjoy building the frames and take pride in being able to make something that intentionally complements each picture.
Here, I’m fitting the frame around the finished painting. I begin making color decisions for toning and finishing the wood with the painting in place. The frame will be sanded and shellacked for smoothness.
I first decide whether I want the frame’s effect to be darker than the dark notes of the painting, lighter, or somewhere in the middle. Dark makes the picture stand out (or”pop”, a word I don’t like!), but also can make the picture feel heavy in the room. This is especially true in Hawai’i , where light colors and an airy feel are part of a desirable interior. I choose to go with a middle tone, picking up on the colors in the shadows.
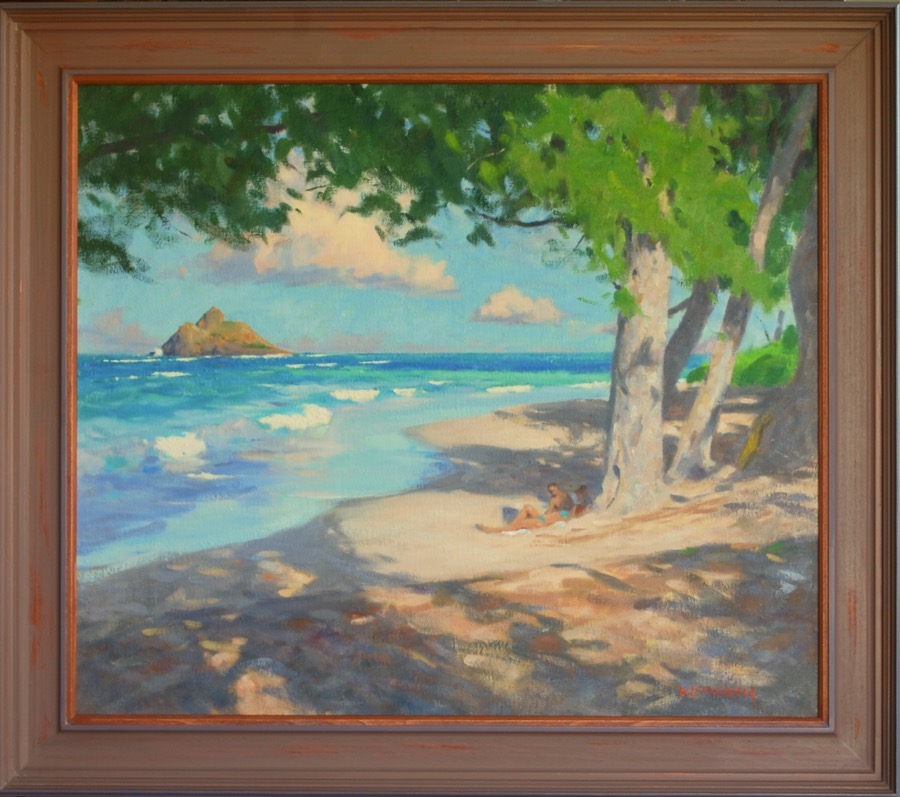
And here’s the final painting. October Sun, 26 x 28″, oil on hand primed linen. And currently available for sale.
The completion and framing of this piece was completed in time for entry into the Pastel Artist’s of Hawai’i Annual Open Show, where I was pleased to find that it had been awarded 2nd place.
Far and Beyond-Waimanalo Bay Pastel on paper 26 x 28″
The development of the painting has been featured a bit in prior posts, but suffice it to say that the genesis of the painting is from a hike with a sketchbook and my smallest pastel set. I like the idea of that, really. It’s the approach that I have hoped to move towards, and now I have a growing track record of studio pieces done from such plein-air sketches that have worked out.
So, I’ll continue to move forward with the idea that I can make small visual events, like the sketch above, into more fully satisfying paintings that allow for more imagination and personality. For a painter, this is real progress.
The framed painting is available for purchase on this website .