October Sun

I’ve just finished this new oil painting after many interruptions, mostly weather-related. But I managed to shoot some sequential images along the way, and I hope you find the process and progress interesting.

Octobe Sun unframed
October Sun  Oil on hand-primed linen,  26 x 28″


Setting Up

Octboer Sun progress 1

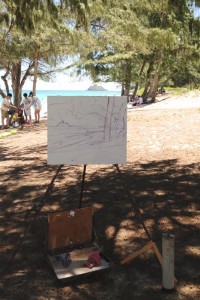
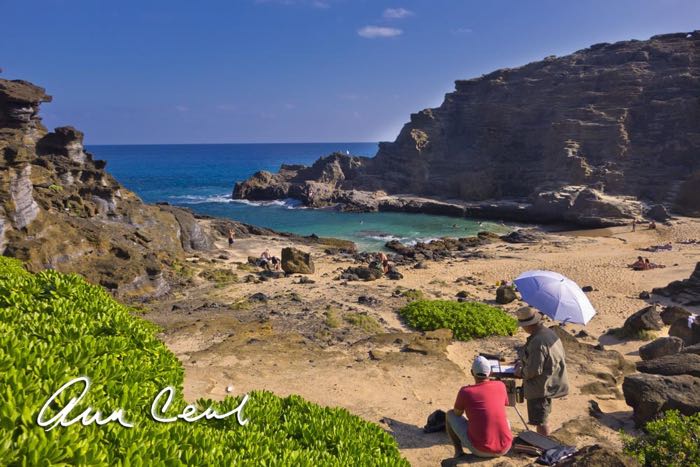
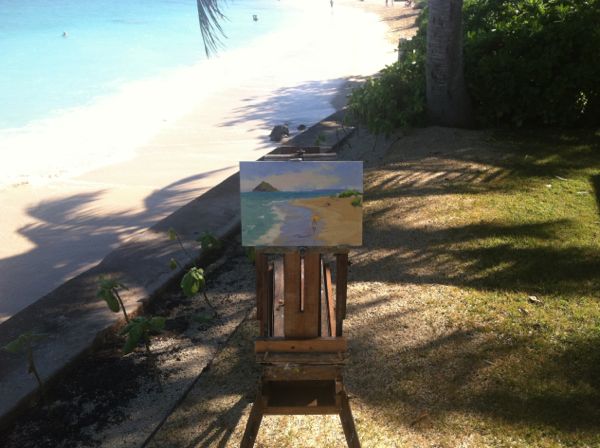
My setup for starting.  I’m careful that the top of the canvas is perfectly level with the horizon, which you can see win the photo. I have a large pair of “Square Corners”, wooden right-angles, leaning against the right leg of the easel.  When used as a viewfinder, these help tremendously with visualizing the composition. They are a must-have for composing from nature like this.

October sun progress 1a

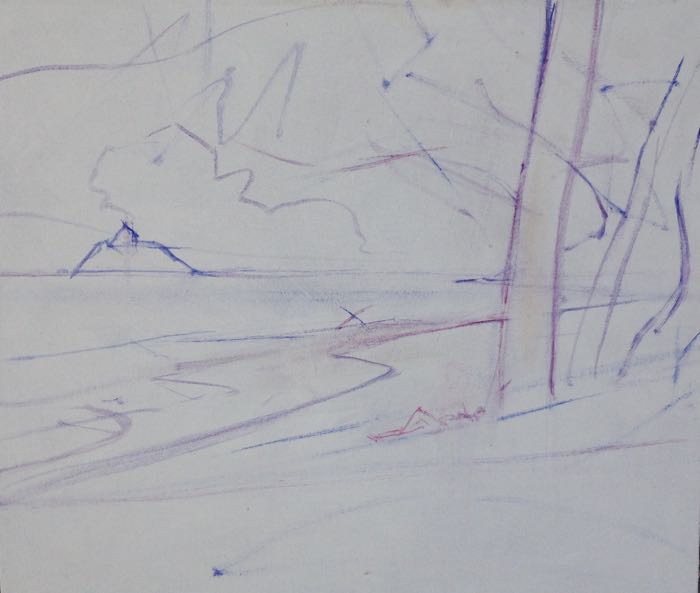
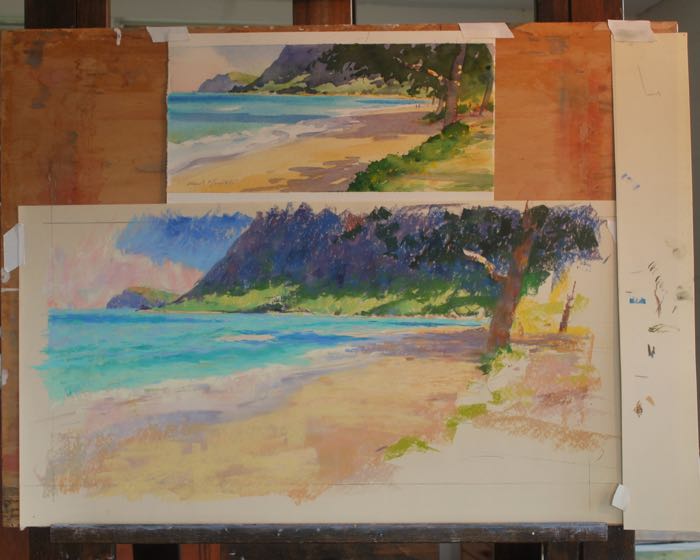
The drawing of the main lines, big shapes, and divisions of space on the canvas.

I start by placing a small x in the center of the canvas to build the composition around. Adjustments included enlarging the main tree in size from what nature provided, and moving the small island on the horizon to the far left of the canvas as a balancing measure. I’ve moved the horizon line up because it was too close to dead center.

All of this is important work and anticipates the end result I have in mind. Chances are good that anything I really dislike in the final painting is already taking root in a choice I’ve made at this stage. This part of the process can be done in one session, and an overcast day is fine for this step.  I prefer to have some time back in the studio with the drawn-in painting to view the composition,  preferably after leaving the location. That way I can be more objective about where I’m heading with the painting.

The composition is drawn in with a thinned mix of Ultramarine blue and Indian red and painted in with a hog-bristle round brush. I use a rag and a bit of Gamsol to wipe away any lines that need removing or adjusting.

Proceeding into Light, Shade and Color

Once light and color are introduced,  the painting sessions require similar light.  And as the painting progresses day to day, the window of painting time narrows to accommodate the specific effect I’m painting.

Octber Sun progress2

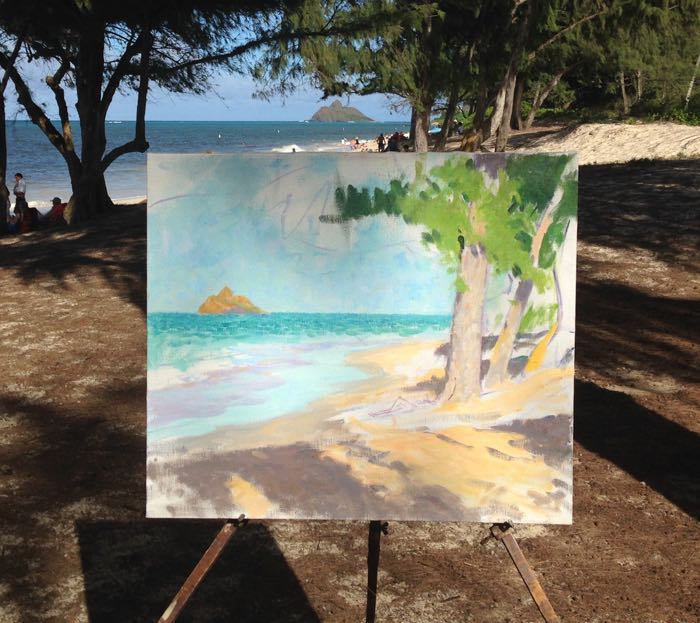
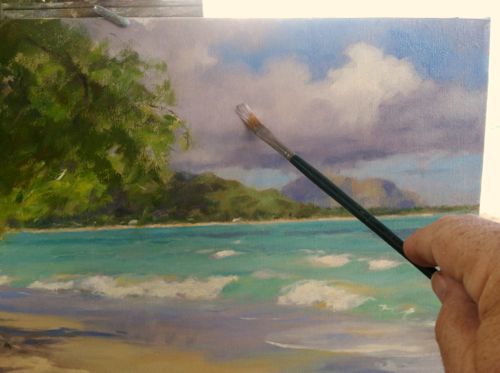
A photo taken after one or two sessions of light/color work.  You can see that I’m careful to have the canvas perfectly level with the horizon.  I’ve established the lightest note of light ( white of the wave) and the darkest dark (foliage in shadow) and every other value-note should fall between those two spots. This photo is taken AFTER the actual work was finished for the day… one must work when the easel is in shade, because working with direct sunlight on the canvas throws the values off, making the darkest notes appear too light.

IMG_1364

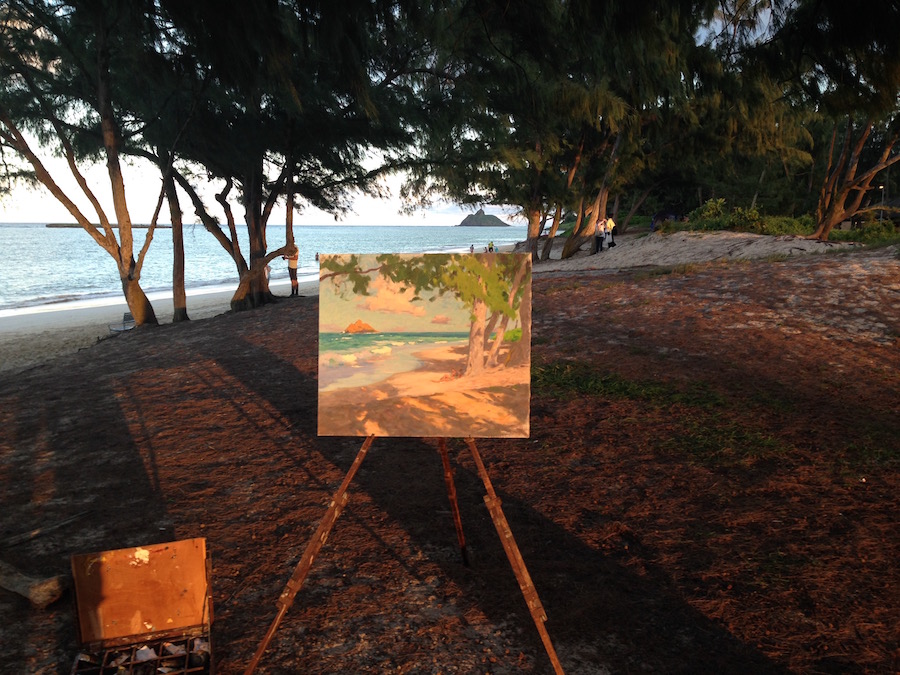
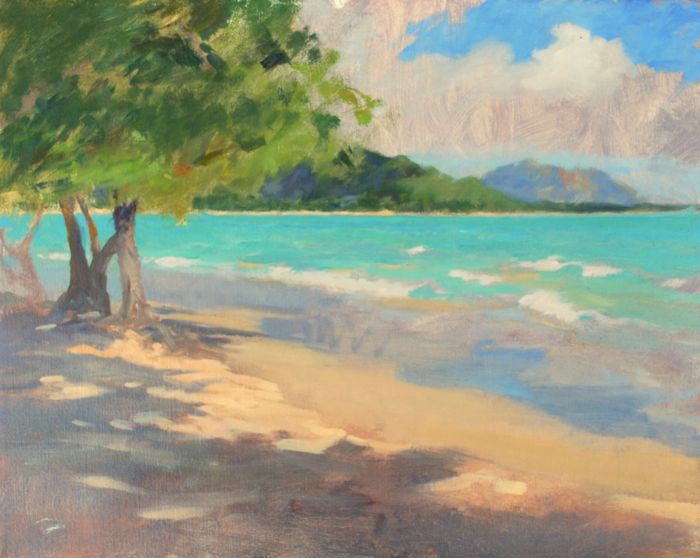
A long shot at the end of a session, close to the last one.  The painting is pretty close to being finished. This is after the light effect has gone, which is a delightful time to be with the painting and in the place after an hours’ s hard work. Notice I’m practically alone on the beach!

Framing 

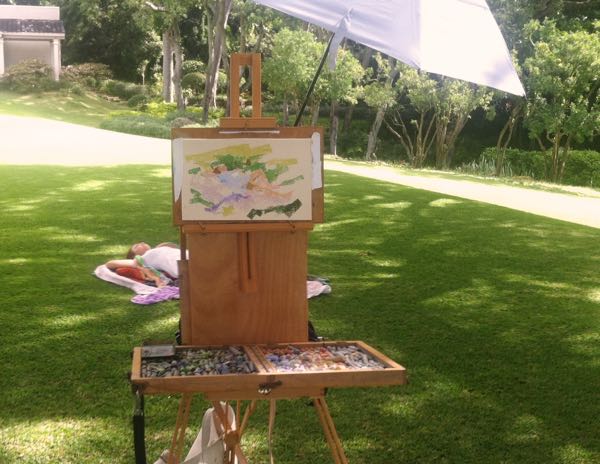
While the painting is in progress, the other side of the effort is that I build and finish each frame for my paintings.  This work takes place on days when I have time to chip away at the framing task, often in the middle of overcast days, since most of my painting is either early  or later in the daylight hours.

26 x28frame

I enjoy building the frames and take pride in being able to make something that intentionally complements each picture.

OctSun fitting

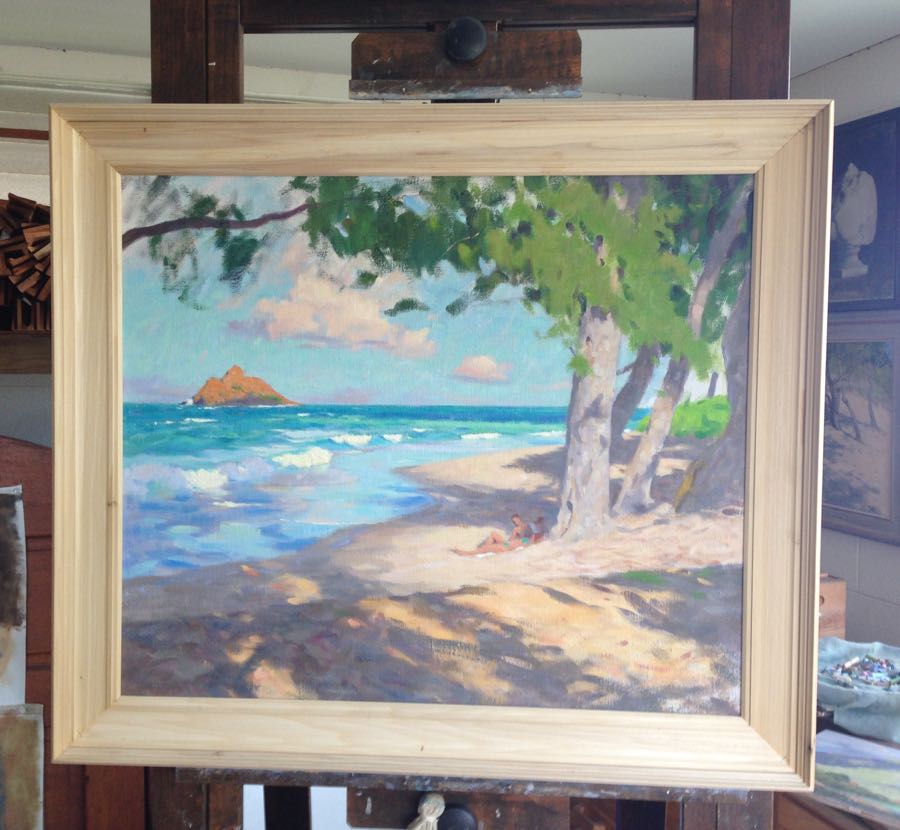
Here, I’m fitting the frame around the finished painting.  I begin making color decisions for toning and finishing the wood with the painting in place. The frame will be sanded and shellacked for smoothness.

I first decide whether I want the frame’s effect to be darker than the dark notes of the painting, lighter, or somewhere in the middle. Dark makes the picture stand out (or”pop”, a word I don’t like!), but also can make the picture feel heavy in the room.  This is especially true in Hawai’i , where light colors and an airy feel are part of a desirable interior. I choose to go with a middle tone, picking up on the colors in the shadows.

Sun

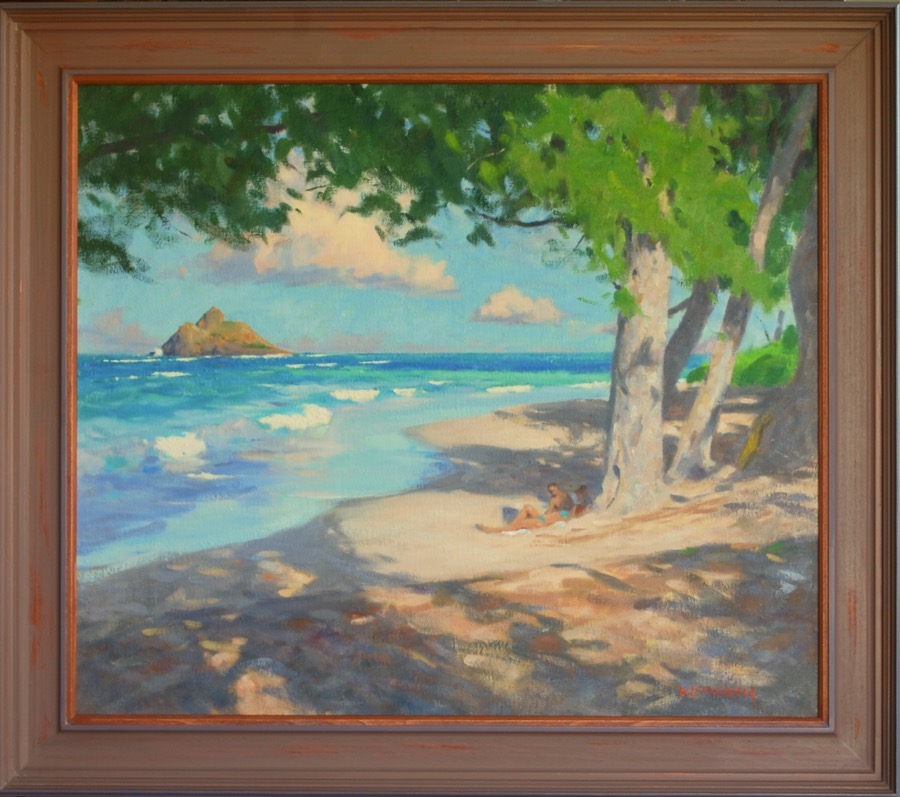
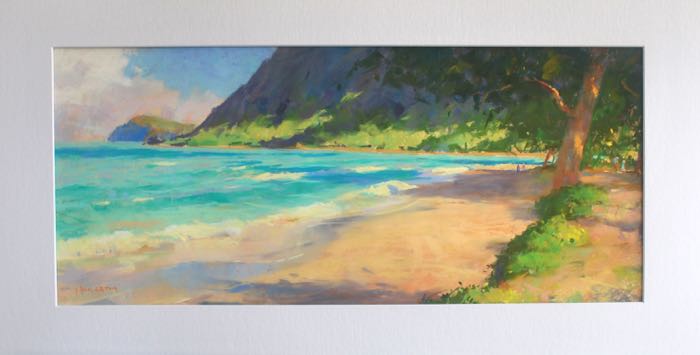
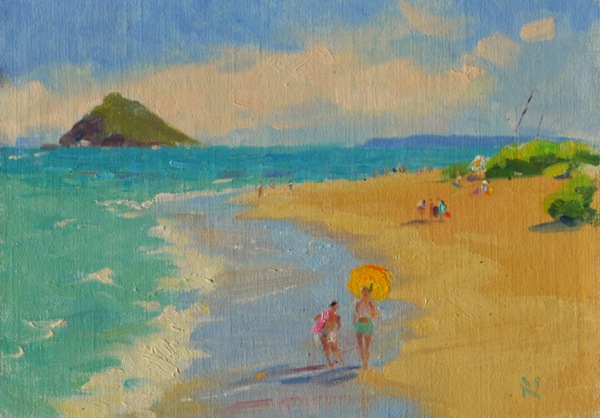
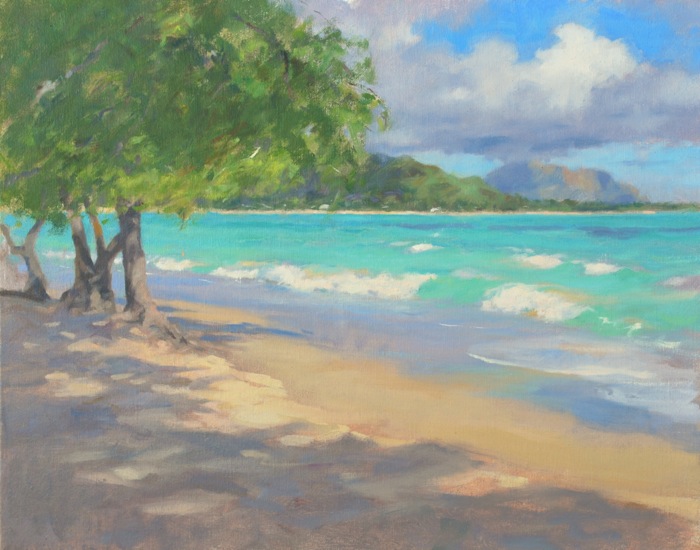
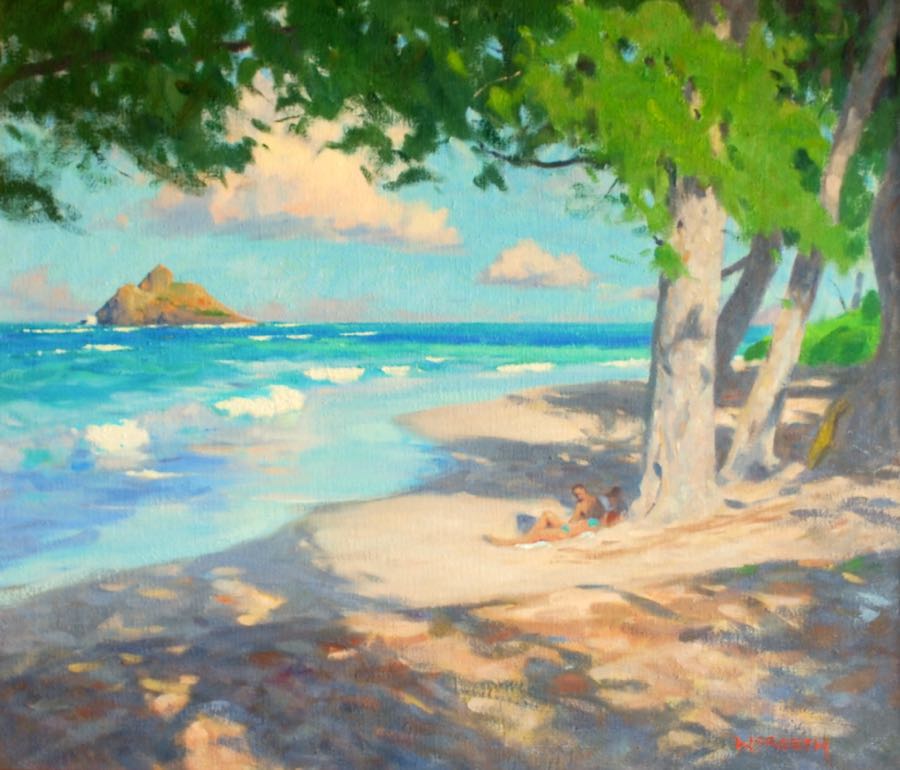
And here’s the final painting. October Sun, 26 x 28″, oil on hand primed linen.  And currently available for sale.

A Lingering Painting Revived

There is something to be said for hanging on to work that seems to be going nowhere. Can a lingering painting be revived?

This is a quarter sheet (11 x 15″) watercolor that was in a stack of unresolved pieces that occupy a drawer or two in my flat files, an Elephant’s Graveyard where works on paper (quite a few) are exiled when they refuse to stay airborne.  Sometimes they see daylight again and come back into usefulness as the backside of a demonstration piece or practice sheet.

At the End-Makapu'u

Makapu’u -End of the Beach  11 x 15″    Watercolor

This painting was probably started around three years ago from a plein air trip to this end of the beach.  It caught my eye the other day…I remembered giving it up as being rather dark and unappealing.  I was originally trying to go after the colors in the water using the darkness of the cliffs as a foil but didn’t feel it had a sufficient exit for the eye and lacked variety in the color.

Approaching it as a stranger now, I could see that with the addition of a few minuscule adjustments I could possibly bring it back to life.  I lifted some paint for figures to provide some sense of scale, lost some edges, and deepened a wash or two. Not more than 30 minutes effort.

The lesson I take from this is that it’s sometimes good to work on multiple pieces and move from one to the next. When you reach an impasse or lose your enthusiasm….just give it time.  There is no expiration date on a painting if the underpinnings of a decent idea might be lingering, waiting to be revived.

Studio Use of Plein Air Sketches

On many occasions,  I’ll find a subject that requires an immediate response, so I take the plunge.  But either weather, the poor quality of the light, or other circumstances make an in-depth plein air study hard to manage.

So, oftentimes I’m disappointed. The results of these plein air sketches are not as effective as they would be if they were more fully developed.  And almost always the main weakness is in the composition. Either nature didn’t provide (or I didn’t recognize) a suitable arrangement of elements to make viewing the painting a fully satisfying experience.

Waimanalo plein air

This sketch (above) is a 7 x 11″ watercolor that is our case-in-point.  It was sufficient in a no-frills way to capture the general effects. But the sunlight was on again/off again, I had interruptions from rain, and the composition now seems crowded into the rectangular format.

A Reminder and a Reference

The sketch’s  real value to me is only this: when reviewed  later, after I’ve moved on to other work, I’m reminded of visual/sensual experiences ( I mean sounds, smells, circumstances) that are now part of my memory.  It conjures recollections much more like a movie than a snapshot. The sketch has become a reminder and a reference.

What artists know is that sketching something plants the entire experience of being somewhere much more firmly in the mind than passive observation or photography. The information from sketching is sifted.  More personal as well as visual, gathered  through the lens of our own personal temperament. And this added dimension ultimately enriches the final painting.

From this stage, I’m then able to deal with the composition.

As mentioned, the first sketch doesn’t suggest the grandness of the place.  It’s hemmed in by the rectangle and lacks clear areas of interest. So I  put together this second study (below) in my studio, making better use of the elements that nature provided  as well as altering the composition to suit my desire for a better eyepatch and more interest.

Waimanalo studies 2
Waimanalo watercolor study, 6 x 14″

This small study is still “the place”, but is now better organized to lead the eye in an interesting way. The addition of figures and refining and simplifying the shapes now give me something with more pictorial interest.

A Point of Departure

From here the watercolor can serve as a basis for many possibilities… an oil painting, a larger watercolor, or a pastel.  In this instance I thought a larger painting in pastel would be a good response, to be worked up in my studio.  So I used both the first sketch and study to refer to as I worked.  I think I developed a better painting than I might have had otherwise…while making it much more “my own” in the process.

watercolor to pastel

Here’s the easel setup with the watercolor study positioned so I can see it directly with the pastel painting.  After several sessions I was able to complete the pastel.

And below is the final painting, now framed and in a private collection.

Makapu'u Head from Waimanalo, 10" x 24"  Pastel
Makapu’u Head from Waimanalo, 10″ x 24″ Pastel. Private collection

One Final Thought

We obviously live in a time of technology, and the option of photography as a useful reference tool has been available and used by many painters for a long time. And undeniably, many beautiful works have resulted from this.

For my own efforts I have decided to invest in drawing and painting without the advantages/disadvantages of photography as much as possible. And I recommend that my students, while they are my students, try and do the same.

Art-making and life-living in our modern world have increasingly become solely results oriented. Labor saving devices are a wonderful blessing for the many people occupied in endlessly routine and stifling or tedious work. We’re thankful for labor saving devices whenever the labor is unpleasant, dangerous, or unprofitable. 

But artworks are different.  We are richer for the experience of interfacing with our subject over time, watching the many variations and possibilities, getting to know the subject in many moods.

On that subject, we’re well served by painter Joseph Paquet’s recently published forward to the Plein Air Painters’ of America exhibition catalog.  He eloquently states the whole idea better than I’m able to.

It’s well worth the click!

Eternity Beach with John and Ann

I had a pair of beautiful afternoons to draw and then paint this 1/4 sheet watercolor at Eternity Beach, more properly known as Halona Cove, last month.  It’s a favorite subject of mine and one that I return to whenever I can.

You never can tell what sort of activity that the ocean will serve up…wind and waves vary here from one extreme to the other.  I find that it’s best to get the composition drawn on one day and return for the painting on another, which is what I managed to do on this occasion.

Afternoon, Halona Cove 12 x 15"
Afternoon, Halona Cove
12 x 15″

I was joined on the second day’s outing by my very good friend John Yamashige, who introduced me to his pal Ann Cecil, a respected local photographer.  I chipped away at the painting while Ann explored the cove, and John and I had one of our wonderful visits. Afterwards the three of us had a chance to sit and visit together as the late afternoon progressed into a cooler time of day.

Halona Cove-04882

Ann was kind enough to shoot some pics of John and myself, so here’s my favorite.  Thanks Ann!

A New Pastel Figure en Plein Air

Our “Painting the Museums en Plein Air” class had our final get together for 2014 on Wednesday morning at Spalding House on Oahu.

Michelle 2

Our model, Michelle, took a reclining pose…and we took advantage of superb weather and luscious surroundings to put in a couple hours with her before having our traditional Artist’s Holiday Bohemian Bacchanalia (Christmas Party).  We had a great time, and I’m happy to have been able to work with this fine group.

A straightforward approach to painting a pastel figure outdoors

As an informal demonstration, I decided that a small pastel piece that dealt directly with the subject in terms of color, shape, and value alone would be interesting. The piece was done without a preliminary drawing, but just as a seeing project.  Simple, mostly squarish strokes ( I refer to them as “tiles”)  of the appropriate color and value placed selectively and as simply as I could.  Very clean color can be had this way.

Michelle sleeping

I fussed with it a bit after, but essentially it’s a direct-from-nature piece, 7 1/2 x 10 inches on some pale yellow Ersta paper I have.  I have plans to frame this one rather soon for a small show, so the frame, mat, and glass are waiting.

If you are interested in finding out more or joining us, you are welcome to check the schedule for our upcoming class here. 

Lanikai Beach: Moving Targets, Straight Paint

It seems that this time of year I regularly find myself scouting for interesting subject matter in Lanikai, a beach spot not far from home. I begin early and drive the main road past Kailua Beach which then rises to the splendid overlook.  I slow down to glance North, across the bay towards Mokapu, and then bend around to follow the one-way loop into the community of Lanikai.

Lanikai, like most other now-famous beaches, was once an isolated and rather barren spot populated by families of Hawai’ian and Asian descent.  I’ve heard folks who lived here during the 1930’s speak about how farmers raised melons to trade for rice with farmers back in the mountains. Cash money was rare. Fresh water could come from holes dug in the sand, there was no electricity, and people birthed their babies at home.  During the war, barbed wire was stretched along the beach.

Nowadays Lanikai is known, and it’s a different deal. Populated by part-timers and foreign visitors as well as locals, it’s become increasingly affluent and crowded.  Sniffy, expensive California styled residences are on the rise and crowding the view. But there still are tiny slices of the old tucked away in corners and unexpected places, and it’s to these that I’m attracted.

Scouring and squinting, I often think that I must appear suspicious to residents as I slowly creep along in my chang-a-lang Rav 4,  peering into yards and empty lots.  I’m checking my rear view mirror for a view of how things appear behind me.  I climb out of my car at odd intervals to study combinations of buildings and flora, dark and light patterns, or spots of color…anything that might hold some promise of becoming an interesting composition.

And so as I went ’round the loop (it’s a single lane, one road in and one road out), I was able gradually to narrow my search to a few possibilities.  Though it was early in the day yet, the sunlight was strong and the sky clear. Streets were already filling with people hitting the beach or doing the holiday yard sales.

Then, out of the corner of my eye, I caught a glimpse of something good.  Dark and light foliage, a flash of  white wall/blue sea on the Makai (ocean) side of the street.  It was a small beachfront property I’d somehow never noticed before. Big modern places had been built closely on either side. Yellow sunlight cut across the darkened entry road  and there were hints of ’20’s-era architecture silhouetted in the dark overgrowth of palms and hedges.

 A Friend Indeed

“No way I am going to get to do this”,  I told myself as I skeptically considered the odds of obtaining permission to paint here. It’s no fun knocking on doors and explaining to people you’re a painter. Try it if you haven’t. And Lanikai has it’s guard up these days… understandably so.  The normally friendly residents have already been tested by the abundant supply of tourists errantly drifting through their yards, as well as out-and-out thieves.

But I was about to be surprised.  As I poked around across the street looking for a vantage point that might allow a shot at this, I saw a big contractor’s truck parked where I hadn’t noticed it on the lot.  And the name on the truck was the company that my pal Brian builds for.

What do you know about that?

And as I’m taking all this in, my feet have me automatically walking across the street.  Hope is like that, I’ve noticed.  Your body just responds to it before your brain has weighed the matter entirely.  But no matter, because at that moment my friend Brian has emerged from a dark doorway, his mind on 20 different things to do with his project.  He then sees me, looking dumbfounded at him.  What are the odds of this? We greet each other.

Yes, Mark, you can have the run of the place if you stay safely out of the way.

IMG_0462

Well, I’ve gone from mild despair to elation in a few minutes.  I thank Brian ( I’m STILL thanking him!), grab my trusty & rusty Julian 1/2 box, and after some deliberation regarding what to paint ( so many choices and so little time) I decide to jump on a rare opportunity to paint the beach from about 15 feet above it.  Looking East, from this incredibly well shaded perch,  Molokai is beautifully silhouetted and the sky and sea are dazzling. Visitors are walking the beach and the colors are beautiful.  Everything is moving, and it is as strikingly clear as one could ever ask for.

Straight Paint  

Unlike many oil painters, I received a lot of practice working with oil paint that is straight from the tube.  This is a hard sell to some painters because we mostly receive the idea that things have to be done to oil paint, added to it,  to make it manageable .  While this is desirable in some instances, it’s not necessary in many cases…and certainly not in this case.  I’d been working with an addition of some linseed oil lately, and also using a traditional 3 part medium for a change after years of straight paint.  On this occasion I left the turpentine (Gamsol actually) at home,  and worked with straight paint on a white oil primed linen panel. I’m happy I did.

It was delicious. Starting with the large masses of sand, sea, and sky I dropped in the large blocks of color with “tiles”, brush strokes of pure paint laid side to side, each mixed to directly capture the color and value needed.  They can be fused and modeled later. This was referred to as “Bunkering” for  the 19th century American painter Dennis Bunker by one of my teachers, James Childs. It’s work at the beginning, especially if one is accustomed to beginning with a thin wash of color that hides the white of the canvas.  But the pay off comes later, because once the painting is covered, the second round of adjusting the shapes and values in this rich lay-in is a real pleasure.  The right amount of paint is in place to model forms and the work almost becomes easier…certainly for me more enjoyable.

And so the morning went….figures briefly appeared that were desirable, though fleeting. The woman with the umbrella was only present for a minute at most…so I have developed the habit of notating the figure on a clean area of my palette, a quick gesture with color, enouch to recall the effect and place it into the painting wet into wet after the general effects of the painting are painted. Her companion was added from a memory sketch the following day.

Lanikai

Starting & Staying Fresh-An oil painting in steps. Part 3

The weather has been challenging; a hurricane was anticipated and this kept me off the beach for several days.  But, we dodged another one and so, thankfully, we’re back with good weather again.  And I’m happily re-engaging with this painting.

Staying fresh is a matter of exercising taste.  A composition has a point to it, a purpose…and if the artist identifies what the point is early enough, questions of what to include and what to eliminate in the painting are answered by whether they help or hinder the desired final effect.

I’m largely concerned with getting the feel of the light…I mean the color of  early daylight on the various elements, and making something beautiful with the composition by  leading the eye through the elements in a pleasing way. Everything I do, anything I add or subtract, should contribute to this purpose.

Here’s where I left off:

Second day's work

The composition is firmly in place and I’m satisfied that I’ve done as much as I can with the basic shapes.  This is, essentially, the painting in terms of design, that what we will irrevocably be “living with” in terms of the pattern of shapes. Today’s and future sessions will be devoted to bringing the painting up; that is, bringing things to life in terms of my objectives.

I’m also wary of overshooting the mark…one can lose the overall unity of the painting by getting caught up in parts and details, observations that don’t contribute but actually clutter the painting.  I’ll need to be very aware, especially when it becomes overcast for lengthy periods because  I can overdevelop an area while waiting for the light to return.

Resuming the Work

After setting up at my location, my first step is to address whatever area of the painting is most out-of- step with the painting’s progress.  In this case it’s the furthest area of the landscape, the sky and clouds in the right background.  Since I have a nice sky today I can easily jump in where I left off before.

The whites of the sky need to be adjusted down a slight bit from the whites in the waves, in order to keep them back in the painting.  This means graying them slightly.   So I mix a slight gray using Titanium white, Ultramarine, a red (Indian, Cadmium, or Light Red), perhaps some Yellow, usually ochre for this time of day,  and place this in the sky loosely.  By loosely, I mean I create a shade of the right value from these various colors, but do not mix them so completely that the colors  lose their individuality. This provides  a tone of a single value but with varied color temperatures in it.

loose gray

The clouds are in motion and the sunlight falling upon them is changing rapidly, so with this light gray in place over all the cloud masses, I can move shapes easily into a more satisfying design.  The effects of clouds on the demeanor of a painting is worth noting as they can help express many different moods. Clouds have a lot of personality! I refresh the blue of the sky with Cobalt blue, a thin layer brushed over the prior work.  With this I can paint edges of white and blue into one another, creating softer edges on the forms.

greying clouds

As I work on this, I eventually find myself over working an area, so I make a point of leaning away from the work (I’m seated) and actually keeping the seat at a distance from the painting so that I need to extend my arm  to paint. The idea is to keep me from getting nose-to-nose with the painting.  I also use an overhand grip on the brush, so that I can hold it with the brush handle cradled in the palm of my hand…this also keeps me back a bit more from the painting. And I try to move from area to area. Water, sky, shadow, light.  Moving all the areas slowly forward, but (hopefully) in a way that stays unified.  If an area is worthy of the eye’s interest , then I will develop it more carefully.  If not, I will try to simplify it as much as I reasonably can.

One of my main areas of interest is in the colors of the shadows in the foreground.  I find such areas to be quite beautiful in themselves. So I enjoy finding color combinations that work within the general value of the shadow, broken colors applied with varied brushstrokes that combine to create vibration of color like what I’m seeing.

As the session draws to a close, I’ve made changes in almost every area of the painting.  Lights and darks in the trees, enhancements of the waves and reflections in the sand, and more refined observations in general.

part 3 image

I’ll be writing another post on the painting soon.  Thanks for the coming along!

My Plein Air Brush Carrier

I use a fairly large number of paint brushes in an average plein air painting session, perhaps 10-15 on a busy day.  At the end of the day, they need cleaning and TLC, but there’s a problem… keeping the many used brushes separate from the clean ones still in my box.

A very reasonable and simple solution is to put together a carrier using something that many painters already have access to… a cardboard shipping tube from a roll of canvas.   In addition to the tube,  all that’s necessary is a quick  trip to the local hardware store for what are called an expansion cap (pictured below with wing-nut) and a clean out cap, both from the plumbing section.  Be sure to measure the diameter of the tube for a snug fit.

Using a handsaw, I cut the tube about 4″ longer than my longest brush.  Next, I shellack the cardboard tube to help  with water resistance.

How to make a Plein Air Brush Container
Make your own Plein Air Brush Container

It’s pretty much that simple.  The rubber cap fits snugly on the bottom, where I sometimes store an extra auto shop towel (my preferred painter’s rag), used brushes then sit atop the rag, and the actual rag I use during the session goes atop the bristle end of the brushes. The expansion cap fits perfectly atop the open end of the tube, providing a virtually airtight seal.  This airtight quality is helpful after a full day in the field if I don’t get to my brush cleaning duties until the next morning, which does happen.

The entire container fits into my backpack. I’ve used this setup for 15 years and it’s been well worth doing.

Plein Air Brush Container